Illustrated Project Proposal

Proposal – my personal project, ‘The Streets of London’.

Aim:  The aim of my investigative study is to show a record of the streets and tourist attractions in London, UK. Within the investigation I’m going to explore different areas of London on foot. I’m going to record the different streets of London, not just the main streets as well as the surprising places I find and well known tourist attractions. This is to show that there is more to see in London than just the normal tourist areas like Tower Bridge.

Background

Discuss in two paragraphs why you want to do this project.

I have an interest in Landscape photography. This is due to the fact I like working with natural light. Natural light can have a massive effect on the outcome of a photo as time of day and year has the sun in different positions effecting shadows. The amount of cloud and even how thick it is can also have an effect. It can make a photo look gloomy and change what your showing / the vision or vibe of it. Under landscapes I want to look at Architecture photography as I would like to learn more about how to shoot and portray buildings, statues and streets better. This also means I get to look back at composition rules, which I think will really benefit my photography overall. The types of photographers who may have an influence on my work will have points of interest in their photos, whether that be a single building on the street or the whole street. The photographers will probably work in colour when taking there photos as well.

I have chosen London as the overall location of my shoots because I live near to it allowing me easy access into London to take the photos. As well as this London as a capital city has its own unique architecture and hidden areas. As a result I really want to learn about and find new areas of London. From this project I hope to show that London not only has the tourist attractions people all know about but to also show that just by leaving the main streets London has many hidden and different places that you wouldn’t expect to find. Due to this I am going to focus on the streets and buildings I find while walk around and through the different areas of London.

Photographer’s research:

1) Steven Irwin

He is a freelance photographer in Cardiff in South Wales. He uses digital and physical manipulation to create cityscapes that are stained, spattered and layered together. This creates heavily manipulated photos that feels rough and chaotic. Full of bursts and layers of colour.

I have chosen this photographer because they relate to the urban theme that I will have in my work, I really like the angles they take the photos from so everything isn’t just square. I also like the physical manipulation shown below with the paint stains and marks. I am thinking of using this in my work to see how that effects the photos I have taken.

Illustrations

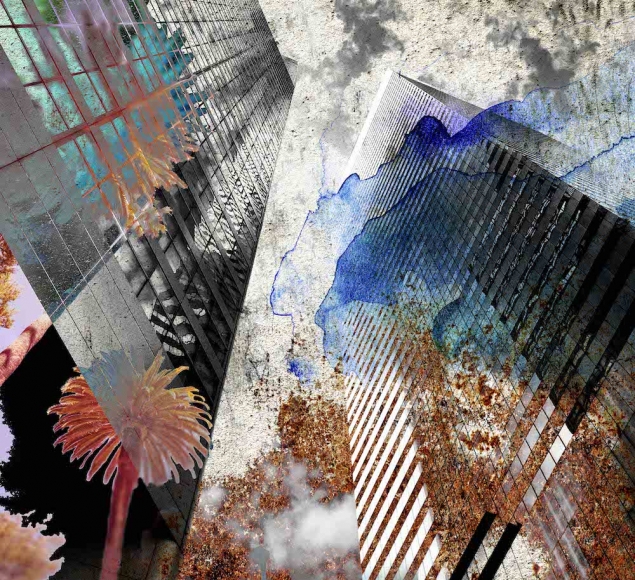
The skyscrapers shown are the a black and white base background. The photographer has then physically manipulated the photo with watercolour paints over the top. The major feeling that come from the photo is chaotic which I think is great. This is because when I think of a city I think chaotic and busy which this really brings that forward.

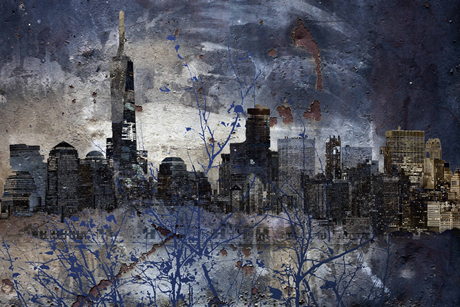
In this skyline photo the buildings are still super prominent even in with the paint over the top. The paint is dark blue and a few other colours, its oil paint and looks like trees in after the leaves have fallen off. However it still gives off the same chaotic vibe. 

2) Nico Goodden

He is based out of London and he is a London Street and Architecture Photographer. As well as this he produces 360×360 photography, light painting and time-lapse.

I chose this photographer as they are based in London so they use the same area that I am to take their shoots. As well as this they don’t just take photos of the main tourist landmarks which is what I am planning on doing as well as take photos of the landmarks.

Illustrations

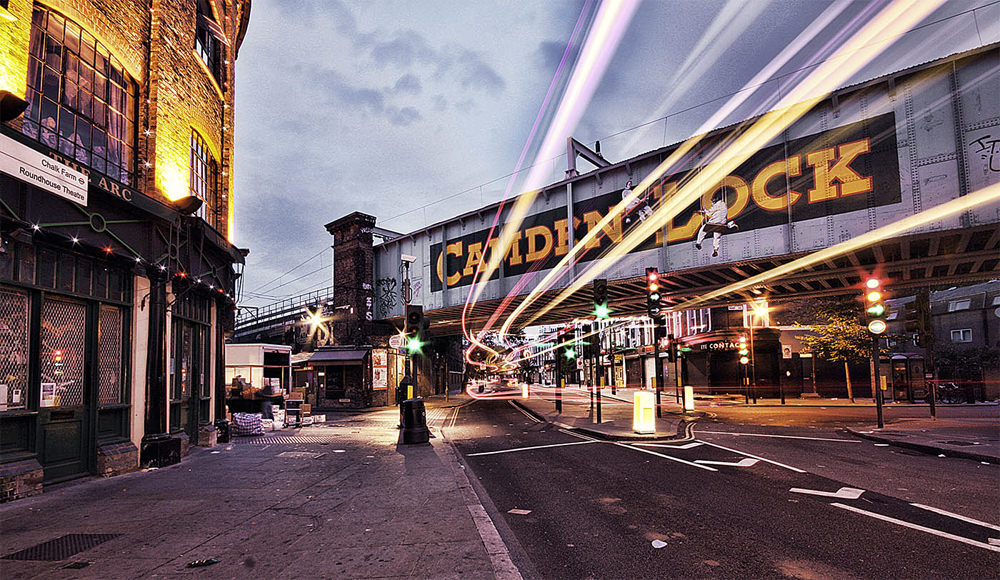
This photo is located in Camden London, at the lock next to the market. This is a know tourist area and many people go there for the different clothes and views. The photo was also taken using long exposure and that’s what created the light lines. 

This photo of the 3 phone boxes is super symmetrical as the windows add to it also making a sequence with the only thing that brakes it is the young boy on one side. However he is directly centre between the two boxes almost carrying it on. I feel like this photo shows a different side to London where its orderly and for me that’s not what I would think when I think of a city.   

3) Paul Reiffer

He is a British photographer that captures landscapes and cityscapes from over 70 countries. The photos he takes are unfiltered and normally unexpected because he always looks behind him. What he try’s to do is to recreate the moment where he first saw the scenery.

I am going to look at the series London: In Blue which is where he takes photos of London at night where the lights during that shoot happen to be blue. He also took the photos through the eyes of a tourist which is what I am looking to do in my project. I also light the long exposure to capture the most colour which I may use in my work.

Illustrations

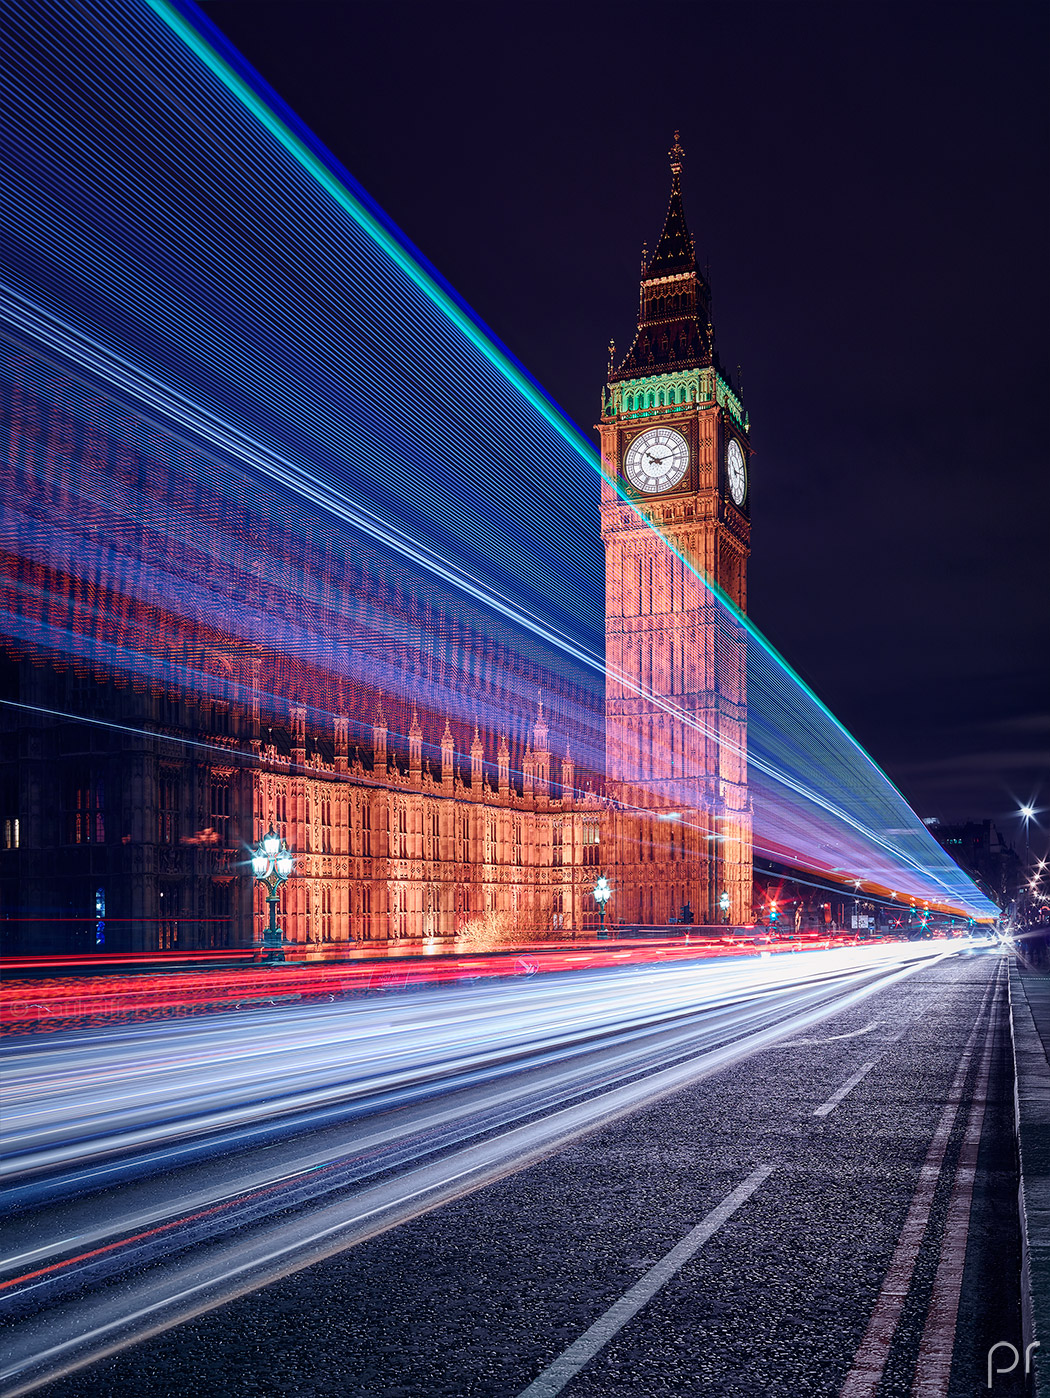
I really like this photo taken of the Elizabeth Tower in London (known as Big Ben, which is the bell in the tower). The photo was taken using a long exposure creating the stream of light. I think that light really brings the photo alive and pulls you into the photo.

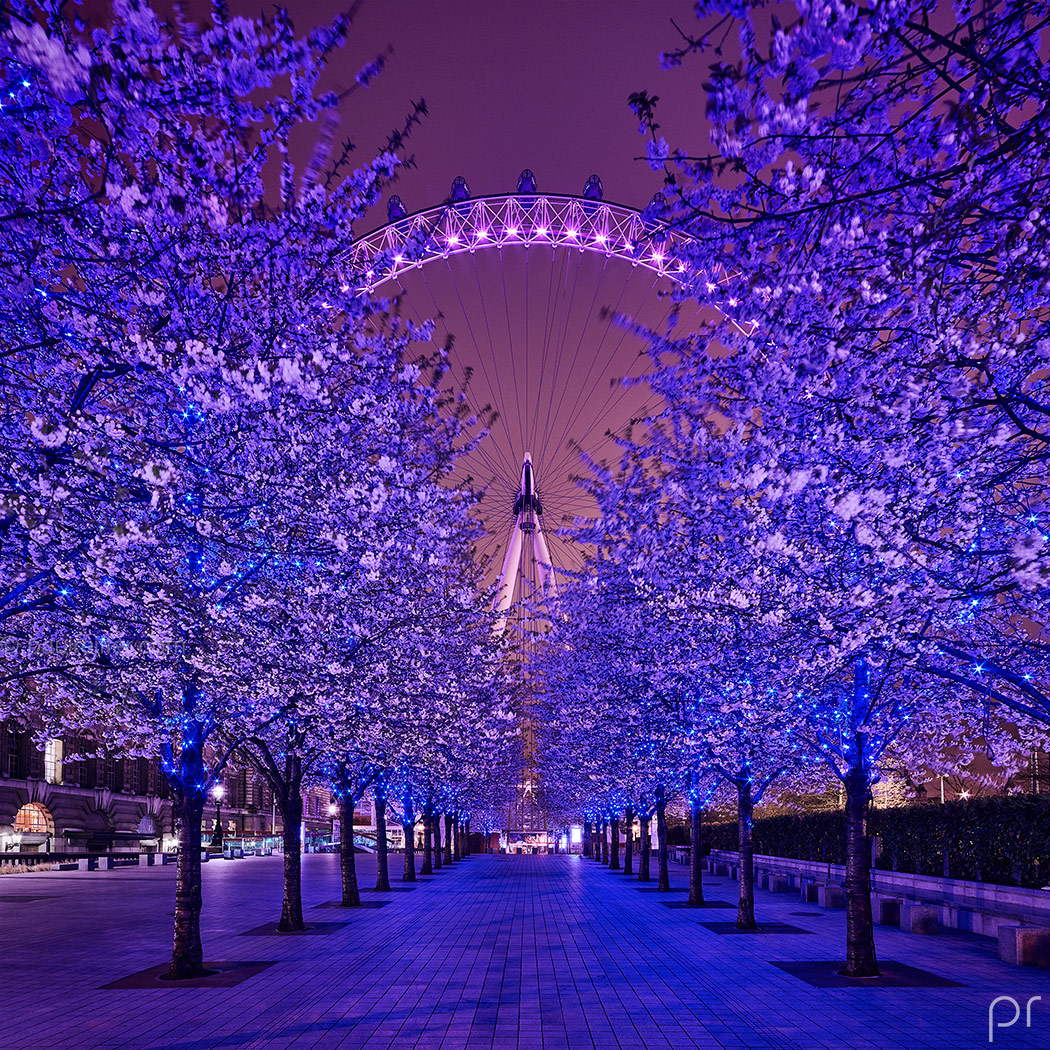
 I think this is an amazing photo where its been framed so it symmetrical, this also was most likely cropped so its a square helping with the symmetrically of the photo. I like the leading line in the photo in the form of the path with makes you feel like you can just step straight into the photo.

Techniques

In the project I am thinking / intending on using the following techniques:

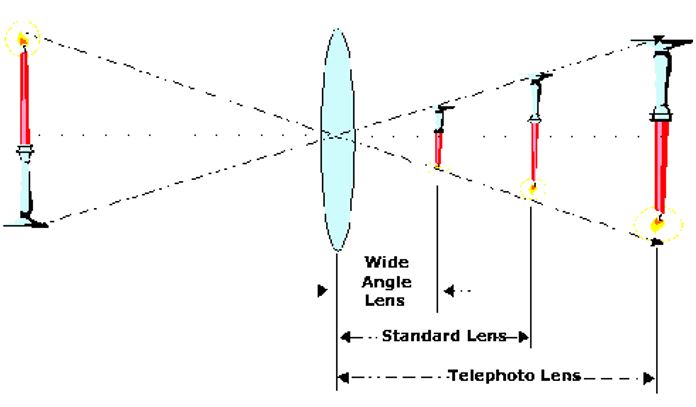
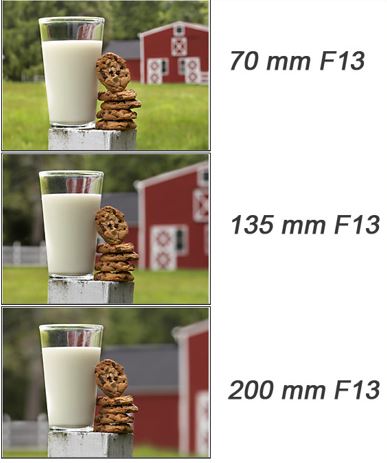
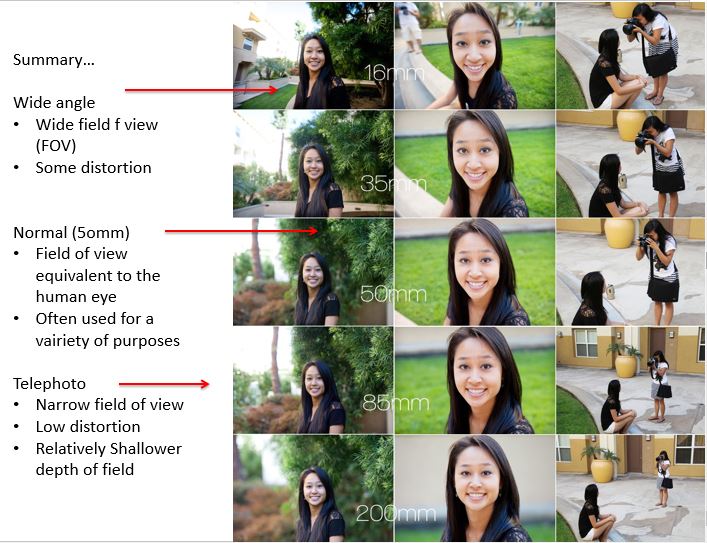
Motion blur / long exposure – in order to show any moving elements like people as that could possibly bring the stagnate building and streets forward. It could also help with the idea of how to ‘walk’ through the photo. So looking back into Leading lines could be a great help and the different types of lines that guide the eyes. If I can I may look into doing a possible night shoot and see if Night Photography effects the city in anyway. This could be interesting as it could bring a whole different feeling or meaning to the same scene. During my work I know I’m going to have to work with different Depth of field’s as it will allow me to take the photos I want, I haven’t had great experience in using this so it will be something to really look into. However I know that due to the type of work I’m going to do during the project I will mostly using a large depth of field so a large F stop will be needed combined with a shorter focal length and a further stance.

I will also explore computer experiments and physical images:

During the editing stage I’m thinking / intending on using photoshop for computer experiments where by I look at removing Lens flare that may take away from the photo and so using the computer to control that flare from the sun. I may also look into Gradient mask as it will allow me to blend two exposures in an image allowing a greater range of light to be shown or balanced. I may also look into Nik colour Efex, which is basically changing the light balance and this can allow the point of focus to be highlighted eg: at the end of a street while naturally darkening the boarders.

For more physical experiments during editing I really liked the work of Steven Irwin and his use of different Paint’s on top of his photos I think it really brought something really different to them and made them really stand out for me when doing research. I would like to allow play around with that as I through it was a really creative way to form this feeling of chaos and busyness that you can get in a city.

Macro Photography

Definition – A macro photograph is one in which the size of the subject on the negative or image sensor is life size or greater, although most of the time we will end up looking at a large size image of a really small insect or flower.

Image Bank

Technique

– Most camera manufactures sell Macro lens which allow photographers to expand the image to greater than 1:1 . However these lens’ are expensive, alternatively learners can use the camera in macro mode if available ( this may not be as effective as a dedicated lens )

– Use point of focus or manual focus

– Use a tripod to frame the object an background, apply compositional tules where possible

– Experiment with depth of field, you will be very close to your subject which results in a sudden drop off on focus, to overcome this you might want to maximise you depth of field therefore shoot at f 16 – f 22. In other circumstances you may like the drop off in focus in which case use lower f stop.

– Work with a low / medium ISO from 100 – 400

– Aply manual exposure and the exposure meter to ensure that the subject is adequately exposed.

– In some case you may choose to use flash light.

Task:

Use the studio and the Nikon camera with macro lens ONLY.  Photograph close up an eye, lips, nose , fill the frame up. Then take up close photos of different flowers.

The first set of photos taken with the Marco lens are all in focus which i really good. I really like how you can see all the different colours in the eye shown. However there is a reflection in the eye from the light used. This effect however i quite like as it shows up even more colours in the eye.

In the next series i wanted to also challenge my focusing skills by using a white flower which means there is next to no contrast making focusing the lens difficult. I believe i managed to keep the flower in focus as well as frame the photo how i wanted it. I really like the out come where all the petals look thin and soft.

In the next series i wanted to see how the lens would act on multiple flowers at slighting different depths of field. I really like how in the photos the ones in the foreground are super sharp and the top of them are starting to blur out. 

In the last series i wanted to see how much detail i could obtain. I like how these photos turned out and i really love the dark veins in the petals that are really sharp making them standout. 

Overall i think i’m likely to use the Macro photography technique in my project. 

Focal Length

A camera lens is composed of multiple lens elements assembled and fitted together in a tube called a lens barrel.

A camera lens may be designed as prime or zoom.

PRIME – has a fixed focal length that does not change. They are also generally higher quality than zoom.

ZOOM – most cameras are supplied with a zoom lens allowing the user to switch from wide angle shots though to telephoto. Zoom lens’ are highly flexible, however certain photographers will purchase specific lens for dedicated purposes.

Focal length – its defined as the distance in mm from the optical centre of the lens to the focal point, which is located on the sensor.

The most important factor in any camera lens is its focal length. This determines which type of lens it is, and what subjects it will be able to photograph. Focal lengths range from just a few mm up to over a m , and can be loosely grouped as follows:

Field of view ( FOV ) – determined by the angle of view from the lens out to the scene and can be measured horizontally or vertically. Its associated with focal length, usually based on the 35mm film photography, given popularity of the format over others.

Larger sensors or films have wider FOVs and can capture more of the scene.

In 35mm photography, lenses with a focal length of 50mm are called “normal” because they work without reducing or magnifying and creates images the way we see the scene with our naked eyes (same picture angle of 46°). 

Types of lenses

Zoom lenses – A lens allowing a camera to change smoothly from a long shot to a close-up or vice versa by varying the focal length.

Wide angle lenses – ( short focal length ) capture more because they have a wider picture angle, broader field of view than the human eye. A wide-angle lens deepens space; it makes everything seem further away from the camera. It also deepens or increases depth of fields. 

Telephoto lenses – ( long focal length ) have a narrower picture angle. This is associated with larger magnification of distant objects. They magnify the images by ‘pulling’ them closer to you. As a result they also magnify vibrations from your trembling hand and when pressing the shutter and this can result in blur or fuzzy pictures. Also is good for blurring backgrounds with a low F Stop.

Typical focal lengths and their 35mm format designations

< 20mm — Super Wide Angle

24mm – 35mm — Wide Angle

50mm — Normal Lens

80mm – 300mm — Tele

> 300mm — Super Tele

Focal length experiment

Need an outdoor location, using the zoom lens, ensure that there is a foreground, mid ground and background.

How to do the experiment

1. Using a tripod photograph the same scene at the different telephoto settings on your lens

2. Record these settings

3. Make sure to observe whether there is any distortion at smaller focal lengths ( 18 mm ) compared to long focal length ( 55 mm )

Example

Outdoor landscape changes

– standing in one place and using the zoom on the camera.

Camera Settings

ISO – 200

F stop 8

Shutter Speed 1 / 125

55 mm 

45 mm

35 mm

24 mm

18 mm

Facial distortion photos

– moving to frame the photo the same every time.

Camera Settings

ISO – 200

F stop 5.6

Shutter Speed 1 /125

55 mm

45 mm

35 mm

24 mm

18 mm

Analysis

For where i stood still and used the zoom lens to zoom out of the photo. The technique worked really well there is a obvious change in the landscape allowing more to be seen. The Tripod i used stopped camera shake and there is no movement other than the different change in stages.

In the series where i moved to keep the frame the same the distortion worked well. There is a clear difference in the shape of the face shown between the 55mm and the 18mm. In the background of the 55mm it is also blurred which is as expected and its not distorted. Where as in the 18mm the background is in focus but there is distortion in the face making it rounder. 

In my project i will use the knowledge of the technique in my work to stop distortion if i wanted to. As well as this i may use the telephoto lens in order to blur a background if i wanted to.

Wide – Angle

Definition – Is an approach taken when using wide angle lens e.g. 18 mm – 24 mm and shooting the main foreground subject close up. This approach will render interesting outcomes as the lens distorts the foreground subject.

Wide – angle lenses can be employed when shooting close – ups for a unique approach to working with foreground elements, unusual perspectives and extended depth of field. These combinations can create some of your most dynamic landscape images.

The technique can be used in commercial, for example in extreme close ups in cinematography.

Image Bank

Effects of wide – angle close up

– Distorts the foreground

– Often used to show foreground interest within the context of an environment

– Surreal imagery can be created

– Can be used to shoot nature ( flowers in a landscape )

– Requires that you shoot at a short focal length 

– Use of a tripod is recommended

Settings:

1. Manual settings 

2. Focal Length – 18 mm

3. Apature – F Stop 8

4. Shutter Speed – 1/125

5. ISO – 200

Images that need improvement 

This photo didn’t work as the subject, in this case it was the person, moved as i was taking the photo.This resulted in a unwanted blur meaning that the distortion of the face in the photo didn’t work. 

In this photo i didn’t get close enough to the subject, the flower, in order to make it look unrealistically big.

In this photo there is to much background and i was close enough. This means the photo has distorted and just looks normal. As well as this there is camera shake as i took the photo so i needed to have used a tri-pod for this photo maybe.

Best Photos

In this photo i zoomed right into the face of my subject as a result distorting the fore head and glasses.

The distortion in this photo is in the flower as it is much larger that life a looks extremely big compared to the steam.

In this last photo the foot that is closer to the camera is distorted so it looks like its a lot larger than the other, which makes you feel like you are about to be stepped on. 

Why does the picture distort?

The reason for the distortion seen is because of the amount of information that’s put into the image which has to the be condensed down into the specific dimensions of the frame.

Overall i dont think i will use this technique in my project.

Animated GIF

Definition – An animated GIF is an image encoded in graphics interchange format (GIF), which contains a number of images or frames in a single file and is described by its own graphic control extension. The frames are presented in a specific order in order to convey animation. An animated GIF can loop endlessly or stop after a few sequences.

How to achieve this :

1. Tripod

2. Fast shutter speed

3. Manual camera settings ( to fix the exposure )

4. Manual focus

5. No camera shake ( be careful when pressing the button )

6. Direct the shoot ( composition / framing and where the moving elements will move from and to are important )

7. Photo-editing software ( Photoshop )

Image Bank

Contact Sheet

Settings 

1. Manual setting

2. Shutter Speed – 1/125

3. Aperture – F 5.6

4. ISO – 200

5. Burst shoot mode 

How to make an animated GIF:

1. Open photos in photoshop, 

2. Go to image, image size, tick resize, select pixels on everything ( width 900 , height 600 , resolution 72 )

3. Do this to ever picture

4. Are the pictures in order

5. Then , cmd a , cmd c , go to original , cmd v ( repeat with other images )

6. Go to window, click timeline

7. Click create timeline

8. Set end duration to 5 on all pictures, then build the animation.

9. Settings on the video bit and select loop, play.

10. Select file, save for web, colour ( 128 ), looping options ( forever )

11. Save to desktop 

Final product

Analysis of the final product

I final product worked as a GIF. The difference between this GIF and the ones in my image bank is that mine is not a noticeable loop. Instead it shows directional movement. There is a need for improvement in this GIF because there is camera shake. I think this was caused when i was holding the capture button and this caused the shake. Either that or the tri-pod i was using wasn’t in a stable position. 

How to improve 

To improve this GIF all i can do is re-take the images however making sure to check the tri-pods stability. As well as this i could have also taken more than one series of images, allowing me more to choose from.

I may uses this technique in my project.

Sequencing

Definition: By definition, a sequence is a serial arrangement in which things follow in logical order or a recurrent pattern. Photo sequencing is actually stitching multiple images together and it is a form of time-lapse photography. A change in an object’s position over time is being displayed and it only works when the object moves across a static background.

How to achieve this:

1. Tripod

2. Fast shutter speed

3. Manual camera settings ( to fix the exposure )

4. Manual focus

5. No camera shake ( be careful when pressing the button )

6. Direct the shoot ( composition / framing and where the moving elements will move from and to are important )

7. Photo-editing software ( Photoshop )

Image Bank

Contact Sheets

Settings 

1. Manual setting

2. Shutter Speed – 1/125

3. Aperture – F 5.6

4. ISO – 200

5. Burst shoot mode 

How to make a sequencing photograph using photoshop?

1. Open photoshop and import the three or four pictures needed to form your image.

2. Then go to the second picture and press cmd A , cmd C. Move to the first picture and press cmd V.

3. After create a mask

4. Next go to the top of photoshop and press edit, fill and choose black.

5. Make your brush white and brush in the area wanted.

6. Repeat with the next picture.

Lastly adjust the image so it looks correct ( e.g. no extra arms or things that lead no where ).

Final Product

Analysing the final product

The final product is all in focus and steady. This means that there is no camera shake that i helped control through the use of my tripod. Within the image i have one person printed in 3 places which is how i wanted them. I also have made sure to have the correct amount of arms and legs within the image.

I am likely not going to use this technique in my project

Design a site like this with WordPress.com
Get started